The Particle Editor can be found in the Database View/Particles tab.
You can use the Particle Editor to create particle effects and tweak their parameters, but also manage and store them.
In order to use a particle effect you can either drag and drop an effect into the perspective view or you assign the effect to a selected particle entity. This entity determines the basic location, angle, scale, and or link information with other entities.

|
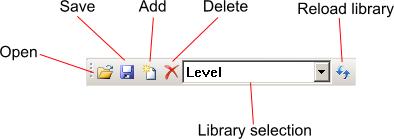
Save |
If you save the level the particle library is saved as well, a faster method is using this save button |
|
Add |
Creates a new library |
|
Delete |
Removes the currently selected library. You need to manually delete it from the hard drive if you want to permanently remove it. |
|
Library Selection |
Allows you to select an available library |
|
Reload |
Reloads the current library |
|
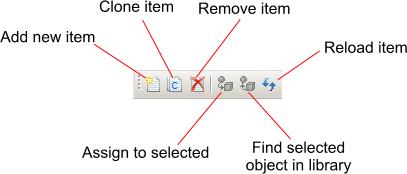
Clone Item |
Clones the currently selected entry |
|
Remove Item |
Deletes the currently selected entry |
|
Reload Item |
Reloads the currently selected entry |
|
Assign To Selected |
Assigns the selected entry to the currently selected level object |
|
Find Selected in Library |
Finds the currently selected level object within the library |

|
Redo |
Removes the last undo |
|
Copy |
Copies all the settings for the currently selected entry to the clip board |
|
Paste |
Writes any entry data from the clip board to the current entry |

|
Remove Sub Effect |
Removes the selected sub effect. |
|
Enable/Disable All Sub Effects |
Enables or Disables all sub effects from the selected (sub-) effect. |
They allow random variation and evolution over particle and/or emitter lifetime.
To access the variation controls, click on the expand (+) widget next to the value. When closed, this widget is colored if any variation values are non-default.
A variable parameter can have the following components:
You have the following some controls to edit control curves
|
Moving a point |
Left-click on a point and drag it around |
|
Changing a point's tangents |
Select the point and press Space This toggles the spline tangents at that point between continuous and non-continuous. Continuous tangents move more smoothly through a point (ease in/out), while non-continuous tangents are more abrupt. To make a given spline segment completely linear, set both end-points to non-continuous. |
|
Deleting a point |
Double-click an existing point, or select it and press Delete |
|
Moving a point in time |
Left-click on a point and drag it around |
|
Editing a point's color |
Double-click the existing point |
|
Changing a point's tangents |
Right-click on the point to toggle the tangents between continuous and non-continuous |
|
Deleting a point |
Select the point and press Delete |
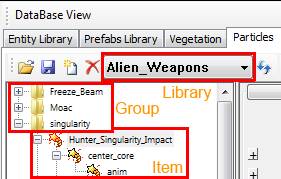
The first thing you have to do is make new library, and save it in to appropriate place. After this, you add your new Groups or Items in it.
For most of case, your work is done at this time. But sometimes you also do implementation work by your self, like put emitter on to scene and link it to asset, or control it by the Flow Graph, or Track View. Also you can setup Material Effect to tell the engine a correct bullet impact effect depends on hit point’s material, or make full screen effect on Flow Graph and implement it into particle effect. You can use Entity Library tab on Database View, to implement effect into any props in game, or Vehicle Editor to implement into any event of the vehicle, like trail or damage effects.

Load Library
Open the browser and pick up the particle library you want to open.
Save Modified Libraries
Save On-Memory Libraries to the disk. This button saves whole libraries on memory if there are any changes, not only the current one.
Add Library
Add new library. New library is remaining until close the editor. If you want to keep it, use Save Modified Libraries before you close the editor.
Remove Library
Remove current library. A warning will pop up. It doesn’t remove the library file from the disc, just remove current library from on-memory library list. If you want to redo the edit of current library without restarting editor, then you can remove library at once and open it again.
Library Selector
Select the current library from on-memory library list.
Reload Library
Reload current library. A warning will pop up. If you want to redo the edit of current library without restarting editor, then you can reload library.
Add New Item
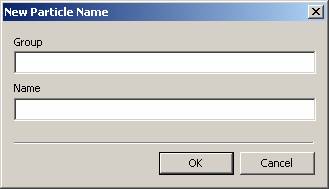
Add new item on current library. New Particle Name window will pop up, to set group name and item name.
Clone Library Item
Clone current item and all of sub items, and then put it to the clip board.
Remove Item
Remove current item. A warning will pop up. It doesn’t change the actual library file on disc, just remove item from on-memory current library.
Assign Item to Selected Objects
Assign current item to the selected items on the scene. Only work when you selecting a top node of the each item in the Item View .
Get Material From Selection
Sort material from selected item on the scene, and make it current on the particle editor. Only work when selected item correctly has a particle parameter.
Reload Item
The button name is Reload Item, but its reload current library currently. A warning will pop up. If you want to redo the edit of current library without restarting editor, then you can reload library.
Copy Item
Copy current item and all of sub items, and then put it to the clip board.
Paste Item
Paste items on clip board to the selected item.
Add Sub Effect
Add a sub (child) item to the selected item. New effect item will created, which totally set as the default value to all of the parameters.
Remove Sub Effect
Remove current item and all of sub items at once.
Enable/Disable All Sub Effects
Toggles enable and disable on current item and all of sub items at once.
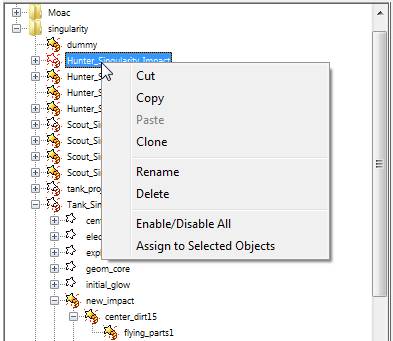
Cut
Cut current item and all of sub items, and then put it to the clip board.
Copy
Copy current item and all of sub items, and then put it to the clip board.
Paste
Paste items on clip board to the selected item.
Clone
Clone current item and all of sub items, and then put it to the clip board.
Rename
Rename current item.
Delete
Delete current item and all of sub items.
Enable/Disable All
Toggles enable and disable on current item and all of sub items at once.
Assign To Selected Objects
Assign current item to the selected items on the scene. Only work when you selecting a top node of the each item in the Item View.
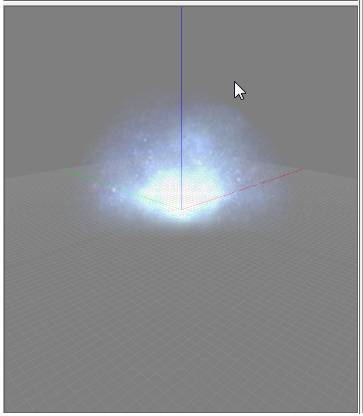
known problems
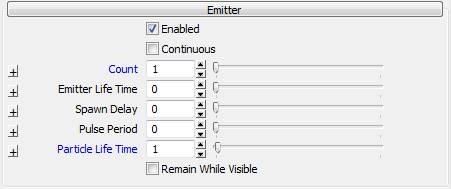
Enabled
Toggles enable/disable current item.
Continuous
If false, all particles are emitted at once. If true, particles are emitted gradually in duration of Emitter Life Time . Once all particles have been emitted, particles continue to emit, maintaining amount number of particles at all times.
Count
Control the total number of particles on current item. When Continuous is on, work as total numbers of particle at any frame.
Emitter Life Time
Specifies a time limit on emitter life if have any value (1 means 1 sec), or infinite life time if 0. Does not apply to non-Continuous effects , which are always disappear as soon as they emit their particles.
Spawn Delay
Add some delay time to the start of the spawning of current item.
Pulse Period
Set interval duration of restarting emitter. If the Emitter Life Time set to 1 and Pulse Period set to 0.2, then this item will restart 5 times in its life time.
Particle Life Time
Set life time to individual particles. Even the emitter expire its life time, spawned particles live out their life time.
Remain While Visible
When it’s on, force the current item to visible until they finish every life time events, if the camera is in the bounding box of the current item. There are some parameters which decrease particles to optimize performance. When it’s on, current item ignores these parameters.
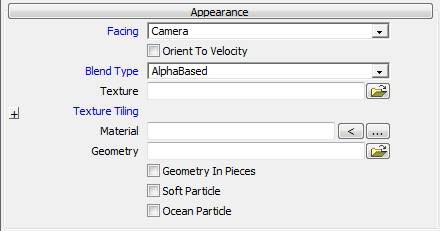
Parameters in this tab control the basic appearance of the particle. Should be tweak at first, because this tab also including Texture, which is the most important parameter, generally used in almost all of particles.
Facing
Applies only to 2D particles, Determine how the sprite is oriented in space. Texture orientation is further modified by rotation parameters.
Orient To Velocity
Forces Texture X axis aligned to direction of movement. Rotation parameters can rotate it further.
Blend Type
Apply only to 2D particles. Determine how the texture blended on to the sprite.
Final Color = Particle Color Particle Alpha + Background Color (1 - Particle Alpha).
Final Color = Particle Color + Background Color * (white - Particle Color)
Final Color = Particle Color + Background Color
Final Color = Particle Color
Texture
Browse and chose texture to use on current item. Display preview of the texture when the mouse cursor is over the input box.
Texture Tiling
Controls multiple usages of the multiple images (tiles) per texture, for variation or animation.
Material
Browse and chose material to use on current item.
Geometry
Browse and chose 3D object to use on current item.
Geometry In Pieces
If true, and the Geometry asset contains multiple sub-objects, then the geometry will be emitted in split-up pieces, one set per particle Count , originating at each piece's location in the asset. If false, each particle will use the entire geometry (all sub-objects together).
Soft Particle
Apply a rendering technique that softens the intersection between sprites and nearby objects, to prevent unnatural seams.
Ocean Particle
For particles spawned on or near the ocean surface, uses a rendering technique that softens the intersection with the ocean.
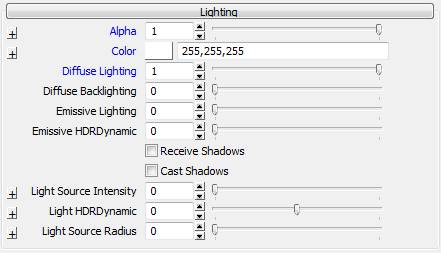
Parameters in this tab control the lighting of the sprite.
Alpha
Control the alpha value of the sprite, in addition to texture’s alpha value.
Color
Control the base color of the sprite, in addition to texture’s color value. Can use color picker or pallet by clicking the color preview box next to the text “Color”.
Diffuse Lighting
Controls the multiply value to the particle color for dynamic (diffuse) lighting.
Diffuse Backlighting
Control the fraction of diffuse lighting that is applied to particle normals in all directions. 0 is standard diffuse lighting, where the normals facing the light are lit the most. 1 is omnidirectional diffuse lighting, where lights affects all normals equally. This can make translucent appearance particle by adding some value.
Emissive Lighting
Controls the multiply value to the particle color for constant emissive lighting. This can make glowish appearance particle by adding some value.
Emissive HDRDynamic
Controls the power to apply to engine HDR multiplier, for emissive lighting in HDR. This can make glowish appearance particle by adding some value.
Receive Shadows
When turned on, Shadows will be cast on current item.
Cast Shadows
Current item will cast shadows.
Light Source Intensity
Controls the intensity for a fill light (cheap dynamic light) created at particle position.
Light HDRDynamic
Control the power to apply to engine HDR multiplier, for particle light source in HDR.
Var Particle Life : Applies additional life time curve in duration of Particle Life Time.
Light Source Radius
Control radius of the particle fill light.
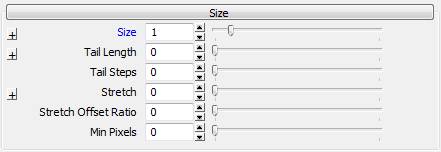
Parameters in this tab control the size and shape of the sprite.
Size
For 2D particles, controls the world sprite radius. For 3D particles, controls the scale applied to the geometry.
Var Particle Life : Applies additional life time curve in duration of Particle Life Time.
Tail Length
Control the length of particle's tail in seconds . Particle texture will be stretched out through tail.
Var Particle Life : Applies additional life time curve in duration of Particle Life Time.
Tail Steps
Control the number of segments for tail. A higher number will produce smoother tail curves for non-linear-moving particles.
Stretch
Control the amount to stretch particle in direction of travel in seconds (based on current velocity). A positive number stretches particle forward, negative backward.
Stretch Offset Ratio
Controls the relative amount to move particle in direction of stretch. To reposition the particle to the front end of its stretch, set to 1. To reposition it to the back end, set to -1.
Min Pixels
Adds this many pixels to particles true size when rendering. This is useful for important effects that should always be visible even at distance.
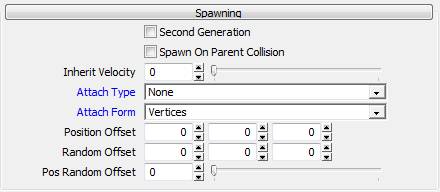
Parameters in this tab control the spawning conditions of the sprite. By default, particles emit from the emitter center in all directions equally. The following parameters change this behavior.
Second Generation
When it’s on, current item will works as a Second-Gene ration Child Effect. See also Child Effects in Basics section above.
Spawn On Parent Collision
When Second Generation is on, hold current item’s spawning until the parent particle collides.
Inherit Velocity
Controls the rate to how much velocity is inherited from parent particle (0-1, 1 means 100%).
Attach Type
Specify the type of emission when current item is assigned to 3D geometry.
This parameter determines Attach Type for the Second Particle from other geometry particles only. For more details, see also Basic/Second Particle above and Advanced Techniques/Attaching Particle To Geometry below.
Attach Form
When Attach Type is not None , Specifies the elements of the geometry (box or mesh) that particles will emit from.
See also Attach Type above.
Position Offset
Adds some offset value (X, Y, Z) to the emission location, in local emitter space.
Random Offset
Adds a box shaped random spawning area (X, Y, Z) to the location of the emission, in local emitter space.
Pos Random Offset
Add a spherical random spawning area (radius) to the location of the emission, in local emitter space.
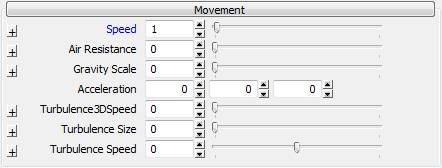
Parameters in this tab control the movement of the sprite.
Speed
Controls initial speed of particles.
Air Resistance
Controls how much react to the global wind speed. Units are 1/seconds. The higher the number, the faster particles will reach wind speed (or rest if no wind).
Gravity Scale
Control how much react to the global gravity. Most physical particles should set this to 1 (use Air Resistance to provide drag). Set to a negative value for buoyant particles such as smoke.
Acceleration
Controls the constant acceleration applied to particles, in world space (X,Y,Z).
Turbulence3DSpeed
Adds a 3D random turbulent movement to the current item, and then control the average speed of it.
Turbulence Size
Adds a horizontal spiral movement to the current item, and then control the average speed of it.
Turbulence Speed
When Turbulence Size has any value, Control the angular speed, in degrees/second, of horizontal spiral motion.
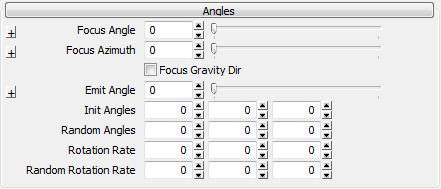
Parameters in this tab control the focus direction (which is by default the emitter's Y axis) and rotation value of sprites.
Focus Angle
the amount to rotate, in degrees from Y axis.
Focus Azimuth
the amount to rotate the new axis about the Y axis.
Focus Gravity Dir
Forces focus direction to world negative gravity direction (usually world Z).
Emit Angle
Control maximum angle of particle emission away from focus axis (emitter local Y). sub-parameter determines minimum angle. Particles are emitted at random angles around this axis.
To emit in a single direction, set to 0.
Init Angles
Controls initial rotation applied to particles, as rotations about each axis, in degrees. For sprite particles, only the Z axis is used, and it refers to rotation in screen space. For 3D particles, all 3 axes are used, and refer to emitter local space.
Random Angles
Control random variation (bidirectional) to , in degrees.
Rotation Rate
Control constant particle rotation, in degrees/second. The axes are the same as for .
Random Rotation Rate
Control random variation (bidirectional) to , in degrees/second.
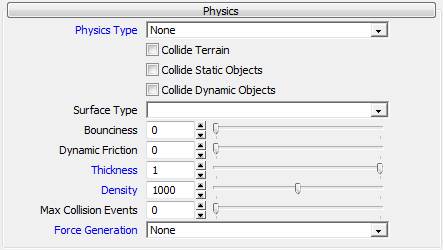
Parameters in this tab control the physics setup for the particles.
Physics Type
Determines how the particle interacts physically.
Collide Terrain
When it’s on, includes terrain in particle collisions.
Collide Static Objects
When it is on, includes non-terrain static objects in particle collisions. This is expensive calculation.
Collide Dynamic Objects
When it's on, includes non-terrain dynamic objects in particle collisions. This is very expensive calculation.
Surface Type
Determine surface material type for collision behavior. If set, overrides Bouncinessand Dynamic Friction below.
Bounciness
Only affect in case Physics Type is set to Simple Collision . Control the elasticity for collision response. Overridden by Surface Type if set. Special value: if -1, particle dies on first collision.
Dynamic Friction
Thickness
Only affect in case Physics Type is set to Simple Physics . Control the fraction of the particle's visible radius to use for the physical radius.
Density
Only affect in case Physics Type is set to Simple Physics or Rigid Body . Control the density of particle, in kg/m^3. An example of the value which physically collect, is for Water = 1000.
Max Collision Events
Only affect in case Physics Type is set to Rigid Body . Limits the number of collisions the particle can have in its physics simulation.
Force Generation
Adds an additional force generated by the emitter.

Parameters in this tab browse and control the sound files. Not so many things can do on sound currently.
Sound
Browse and chose the sound file to use on current item. Assigned sound starts at the time when the emitter starts.
Sound FX Param
Modulate value to apply to the sound. Its effect depends on how the individual sound's "particlefx" parameter is defined. Depending on the sound, this value might affect volume, pitch, or other attributes.
Parameters in this tab Includes advanced appearance and movement settings, and optimization settings.
Draw Last
Modifies draw order of sub effects. Sub effects are rendered by lowest Draw Last value first, or in list order if equal.
Sort Oldest First
Reverses default sort order of particles (newest first).
Visible Indoors
Determines the show/hide setting of the particles, depends on if the particles spawn at indoor or outdoor.
Visible Underwater
Determines the show/hide setting of the particles, depends on if the particles spawn on (in) the water or not.
*Disable Vis Clipping Force to disable Vis Area clipping on current item. There is the Vis Area function in the engine to optimize the drawing performance of particles. Usually, particles can exist in only one Vis Area where they born. When they get out from their Vis Area and get in to neighbor, they starts shrink down and disappear before they get in to it. Only one Vis Area can activated at once in the engine, depends on the camera position. This system often causes unexpected pop out of the particles. When it's on, current item ignores Vis Area clipping.
This Function can see on build No.5681, but it's already disabled. Will be removed from the future builds. There will be another solution in future.
Not Affected By Fog
When it's on, current item ignores scene fog.
Ignore Attractor
When it's on, current item ignores any attractor that is applied to the emitter.
Draw Near
When it's on, Current item rendered in the special "Near" rendering pass. Usually use for 1st person weapon's effects.
No Offset
This is for the 3D geometry particle. When it's on, Current item uses geometry's origin as particle position. Default is to use geometry bounding box's center.
View Distance Adjust
Controls value to the distance of automatic fade-out. When the sprites get close to the camera and fill out the screen, it causes serious drawing cost problem (this cost called as Fill Rate Cost ). To avoid this, particles start fade out when they get closer than 1m distance from camera by default. If you need to draw more near area sprite, try to decrease this value.
Fill Rate Cost
Controls the max screen fill allowed per emitter. This value is the "cost" of the fill, so making it smaller allows particles more visible.
Motion Blur Scale
Control the degree of the motion blur on particles.
Bind Emitter To Camera
Forces to relocate current items position to the camera position, and then link them. Useful to making rain or snow effect, which the player can not passes by.
Move Rel Emitter
Forces particle motion in emitter space; particles will move with its emitter.
Space Loop
Particles loop within a region around the camera, defined by Camera Min/Max Distance. This is useful to make rain or snow effect, which has the infinite spawning area.
Encode Velocity
Used for a special shader only; encodes particle velocity in vertex data.

Set the minimum system configuration level for the current item.
Config Max
Set the maximum system configuration level for the current item.
DX10
Set the configuration about DirectX 10.
GPUCompulation
Set the configuration depends on if the GPU-based particle computation is supported or not.
Both: Enables the current item always.
Multi Thread
Set the configuration depends on if the Multi-thread computation is supported or not.
Basic Attachment
To attach particle effect to the other entity, use Link Object tool on editor and link particle effect entity to the source object entity at first. Then set AttachType and AttachForm in the particle effect entity parameter appropriately, not on particle editor. There are also AttachType and AttachForm in particle editor's parameter, but they only affect on the Second Particle from other geometry particle. For more details about Particle Effect Entities.doc
Second Generation Effects
You can attach emitters to the parent particles, as part of the parent particle effect. If the parent effect has geometry , then the Second Generation effect can optionally emit particles from that geometry, based on its parameters. In this case, AttachType and AttachForm parameter are controlled from the Particle Editor.
Breakable Objects
There are several ways to create breakable geometry in the engine. All are based on a CGF authored with multiple parts. All optionally allow secondary particle effects to be spawned on the broken pieces.
Set the effect's Geometry to a multi-part CGF.
Set Geometry in Pieces true, and Count 1 (for 1 exploding object).
Set appropriate values for Speed, Focus, Rotation Rate etc to create a nice exploding effect.
Optionally set Rigid Body for physicalized pieces.
Optionally create Second-Generation child effects, with appropriate parameters, to create secondary particle effects on the pieces. These effects will spawn at the location of each piece, and if set Continuous , will stay attached to the piece during its lifetime (useful for fire, etc).
The total number of particles in a scene is actually not very critical. Much more important are total fill-rate, physics, and (to some extent) spawn rate. So, in a framerate-challenged scene, try to avoid these things:
*Large Overdraw For example, using several large particles (Count > 1 or 2, Size > 1m), additively blended to achieve dense, chaotic glows, refractions, etc. Instead of multiple overlaid sprites to provide chaotic variation and overall density, try the following techniques: Use an Alpha texture with high average opacity instead of Additive.
Use just 2 particles at a time, and carefully tune the lifetime, rotation rate, and set curves for Alpha, Color, Size, so that they combine in chaotic ways.
Large full screen particles should have the Fill Rate Cost set at 1 or above, as far as possible.
Soft Particles
Soft Particles and expensive shaders, such as refractive materials. These are quite expensive when used with several large particles. Use Soft Particles only on sub-emitters that are near the ground, and have only small particles. Create similar sub-emitters higher up, that emit particles that never intersect the ground, and don't need soft particles.
For fire, use a horizontal glow texture. Combine that with some glow billboard sprites emitted higher up that don't intersect the ground. None of them need Soft Particles.
Small particles don't need soft particle.
High-resolution textures
Use lower-res textures (if sharp details are not required), and texture compression.
High-count second-generation
Each 2nd-gen effect causes an emitter to be created for each particle in the parent effect. This can be quite nice, but somewhat expensive, so use sparingly.
Physics Parameters
Simple physics and rigid bodies are very expensive, even simple collision costs a lot of performance. In the event of wanting many colliding objects its best to clone the emitter with the colliding particles and make one only spawn about 20% of the other, and enable collisions only on this emitter. As long as some particles are colliding it will look like everything is colliding.
If simple terrain collision is enough, set Bounciness > 0, and don't use rigid body.
Consider splitting an effect into sub-effects, so that only a few particles (perhaps large ones) have Real Physics for appearance, and the rest just go through the ground or fade out quickly.
Geometry Particle
Drawcalls are added from using geometries as particles, one drawcall per mesh spawned. Where possible just use non camera aligned sprites using full rotations to resemble meshes at least in their rotation.
Small Particles
Small particles like sparks can have a max distance applied to them to make sure they aren't rendered even as very small, single pixel particles. Especially those with collisions, should be turned off for the lowest spec.
Turn off Diffuse Lighting
Diffuse lighting should not be used unless it is needed, for self lighting effects like sparks and explosions where they would create their own light the diffuse lighting slider should always be set to low.
Keep Short Duration
Keeping effects short in their lifetime obviously helps performance but it also makes the effect more powerful, coupled with a good sound. For explosions the shorter the fire stage of the explosion is the more believable it is. You don't have a chance to see the obvious textures used to create the structure of the effect. This applies to most effects in the game.
Set Enabled as True
Top node of the effect should be set true on Enabled .
Set Count as 0
Top node of the effect should be set 0 on Count .
Bind To Emitter
Top node of the effect should be set true to Bind To Emitter .
You can add some physical force by using Force Generation parameter in Physics tab. These are some examples of the Force Generation .
*Hierarchal Attracted Effect As written in Basics/Child Effects above, you can make hierarchal effect. When you use Target to Force Generation parameter, you can make hierarchal attracted effect which has a specific, impressive movement.
You can see every sub particles are attracted to the parent effect's particle position through their life time. By repeating this procedure and do some tweak, you can make impressive effect which has very complex movement. Only Target force has a special rule that it's affect only on sub effects of its self.
Wind Force Effect
By adding wind force to the effect, you can blow the particles and vegetations around the spawning point of it. It's a powerful function to make explosive effects like hand grenade.
Appearance of particle it self doesn't has any effect on force generation. You can add Count Value and tweak appearance if you want. Intensity of the wind force is controlled by the Speed value of the wind force effect, and affected effects must have value on Air Resistance .
Gravity Force Effect
You can also add gravity force to the effect. Intensity of the gravity force is controlled by the Gravity Scale value of the gravity force effect, and affected effects must have value on Gravity Scale .