For example, if your Mod is named “mymod”, create a new folder with that name. The path should look something like this:
root directory of your Crysis Game \Mods\mymod
The structure within the Mod Folder needs to be the same as in the root game folder. So, if you wanted to add new objects to your Mod, create a subfolder called “Game”, then another folder called “Objects” where you can place your custom objects into. The path should look like this:
root directory of your Crysis Game \Mods\mymod\Game\Objects\
Here is a full list of how the folder structure inside your mod should look like:
root directory of your Crysis Game \Mods\MYMOD\Bin32
root directory of your Crysis Game \Mods\MYMOD\Code (C++ source)
root directory of your Crysis Game \Mods\MYMOD\Game\
root directory of your Crysis Game \Mods\MYMOD\Game\Animations
root directory of your Crysis Game \Mods\MYMOD\Game\Entities
root directory of your Crysis Game \Mods\MYMOD\Game\Fonts
root directory of your Crysis Game \Mods\MYMOD\Game\Levels
root directory of your Crysis Game \Mods\MYMOD\Game\Levels\Multiplayer\
root directory of your Crysis Game \Mods\MYMOD\Game\Localized
root directory of your Crysis Game \Mods\MYMOD\Game\Libs
root directory of your Crysis Game \Mods\MYMOD\Game\Materials
root directory of your Crysis Game \Mods\MYMOD\Game\Music
root directory of your Crysis Game \Mods\MYMOD\Game\Objects
root directory of your Crysis Game \Mods\MYMOD\Game\Prefabs
root directory of your Crysis Game \Mods\MYMOD\Game\Scripts
root directory of your Crysis Game \Mods\MYMOD\Game\Shaders
root directory of your Crysis Game \Mods\MYMOD\Game\Sounds
root directory of your Crysis Game \Mods\MYMOD\Game\Textures
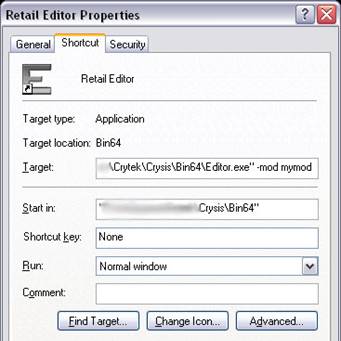
The target line should look like this:

The Editor will then load up with your mod files (such as new assets), or the default game files if no other files exist.
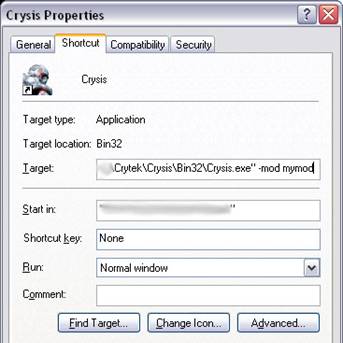
The following you will find an alternative method of loading a mod in Crysis if you do not want to use the Mod Loader that is embedded ingame. To launch Crysis directly with having a mod loaded, you need to run the Crysis.exe with a command line parameter.
The target line should look like this:

The game will then launch by having your mod loaded as well. You can deactivate it ingame via the Mod Loader if you wish so.
Re-Packing your Mod
In order to optimize your modification for the distribution it is always good to pack the folders inside your mod in order to minimize the size and to keep everything easily structured for the community.
This is a list of which folders should be put into one new .pak file:
Animations.pak
Animations
GameData.pak
Entities
Fonts
Libs
Materials
Prefabs
Scripts
Music.pak
Music
Objects.pak
Objects
Shaders.pak
Shaders
Sounds.pak
Sounds
Textures.pak
Textures
Before you start creating such a .pak file be sure to have a ZIP or RAR program (such as WinZip, 7Zip or WinRar) installed. To create such a .pak file please follow these steps:
root directory of your Crysis Game \Mods\mymod
The file is called “info.xml” and includes the following content.
<?xml version="1.0" encoding="utf-8"?>
<Mod Name="<yourmod>" Version="<0.0>"  Screenshot="<jpg file>" Description="<description>" url="<URL>"/>
The following is a description of what kind of information can be put into this file:
Mod Name = "" //put in the name of your mod
Version = "<0.0>" //add the version number of your mod
Screenshot = "" //image for the mod loader menu
Description = "" //description of the mod
url = "" //URL of your mod/mod team
It is recommended to always implement a small banner of your mod that is getting displayed automatically when selecting your mod ingame via the Mod Loader. It helps the community to identify your mod easier and also looks nice and more professional.
To add an image place a screenshot with the maximum size of 512x384 in your mod folder and add the full name of it to the Screenshot description inside the “info.xml” file.