When you first load your character into the Facial Editor by using the Character > Load command in the main command bar of the Facial Editor.

In the Effectors Sliders view there should only be the basic morphs visible which have been exported from your 3d package.
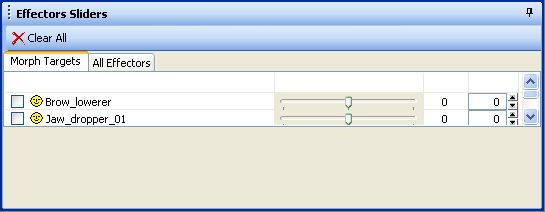
In this case we have two different morphs; Brow_lowerer, and Jaw_dropper_01.
It doesn’t matter if you load a head character only, or if you load a cdf-file which has a head character attached to it as a skin attachment.
Also in the Expression Explorer view, the two available morphs are listed. In the top bar of the Expression Explorer, you can notice that there is already a name for an Expression Library file set, which is automatically named after the loaded character. Mind that this file is only existing in memory by now, and still needs to be saved to your hard drive. This could be done from the main toolbar under Expression Library> Save as
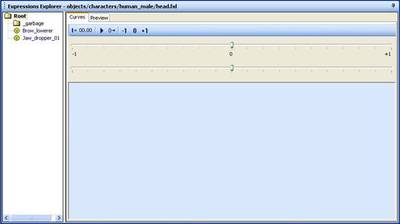
To keep the structure of the library clean, we can organize the different expressions into folders. To create one, right-click the “root”-folder, which is created by default for every character and chose “New Folder”.
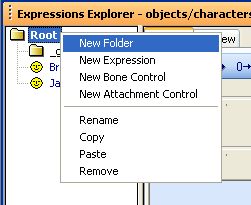
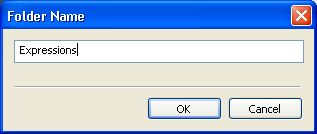
Enter the desired name in the text-box that opens and hit “OK”.
Right-clicking the newly created folder, gives you the option to create a new expression.
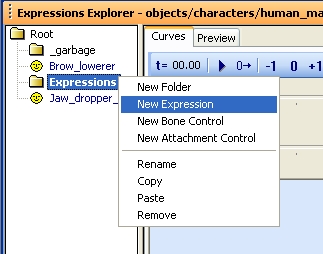
Type in a name for it and hit “OK”. This creates an empty container which will keep the morphs which should be part of it.
In order to add morphs which define the expression, we switch over to the effectors slider view, and set the sliders of the morph-targets we want to have an influence to the appropriate value. To start from scratch, you can hit the “Clear All” button in the main bar of the sliders view.
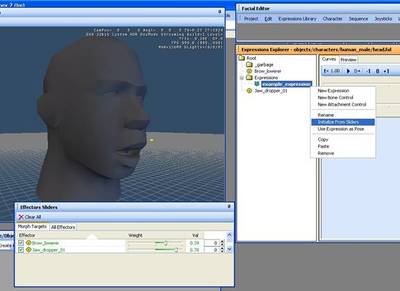
Once done, you right-click on the new expression in the Expression Library view, select “initialize from sliders” and confirm the following dialog by selecting “Yes”. This adds the morphs which have a value set other than zero under the expression node.
On the right side of the expression library view, a curve is created for each of the morphs which have been added to the expression while initializing it. The displayed weight curves visualize how strong each morph contributes to the resulting shape of the character.
Right-clicking the curve lets you change the weight of the curves or switch them to non-linear or “spline-based” interpolation. Spline-interpolation gives you the ability to add keys to the curve and change their influence throughout the range of the assembled expression. With this you can simulate non-linear morph mixing, by adding “intermediate” morph-targets and reduces the need to have each morph represented as a single curve in the sequence view.
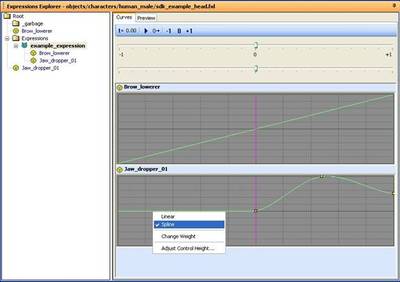
The purple line represents the “zero” value when the expression is animated in the sequence view later on, going up to “1” on the right side or “-1” to the left. In the example shown above, the “jaw_dropper_01” would have its strongest influence at a keyed value of “0.5” in the sequence view, going back to about 50% when the expression has a keyed value of “1”.
Once you are done with creating all the different expressions you need for your character, you can save the expression library.
To make sure the expression library is loaded correctly next time you use this character, a cal file can be used to define the correct library for each head.
The cal-file for each head needs to be saved to the same folder where the head character is located. It only contains the relative path from your game directory to the Expression library-file.
head.cal: $facelib = objects/characters/human_male/sdk_example_head.fxl
The sequence view also offers the same functionality to organize your expressions similar to the Expression Library by creating sub-folders, where the different nodes can be placed in. It also shows the “root”-folder by default under which all subsequent folders are created by right-clicking it, and choosing the “New Folder” command.
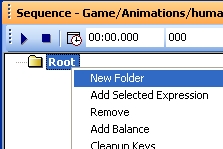
By highlighting an expression in the Expression Library view, and then right-clicking on one of the folders in the sequence-view, you can use the “Add Selected Expression”-command to add it to this folder.
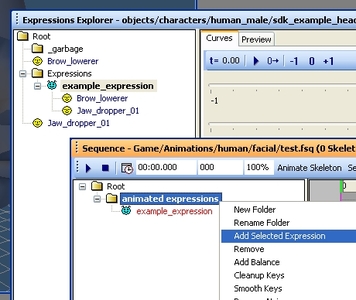
Now you can start animating the expressions you added by placing keys on its curve, either by double-clicking it, or by using the “R”-shortcut, to place a key at the time-slider position. The structure and animated curves in the sequence view are saved together in the sequence file. Do this by going to Sequence save as, in the main toolbar of the Facial Editor.
The Facial editor also supports bone-driven animations. If the character cdf has bones for head or eye rotation, you can also set them up in the Facial Editor to be controlled and animated through curves and joysticks.
To do that go to the Expression Library, and right-click a folder to create a “New Bone Control”.
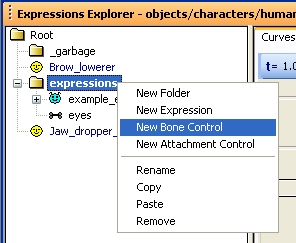
When you highlight the newly created bone control, you can see its options on the right side of the expression library view. In the drop down-list beside “Attachment/Bone” you can chose which bone to control with the expression. In the position and rotation settings below you can define an offset for an attachment and the axis and its limits about which the expression can rotate the bone.
Another convenient method of animating expressions is by using joysticks. After you added expressions to the sequence view, you can go over to the Joysticks view, and setup joysticks to control their values. Turning on “Edit Layout” in the upper Left corner of the view brings you into edit-mode so you can create new controls by right-clicking in an empty area. While you are in “Edit Layout” mode you can change the shape of the templates by dragging on its sides or corners and arrange them freely in the view. Right-clicking on the template gives you various options to farther change the appearance of the controller like its name, or color i.e.
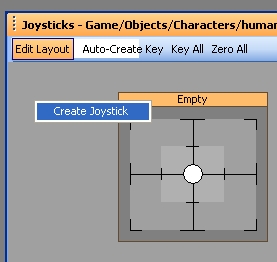
To activate the joystick, highlight the expression which should be driven by it in the sequence view, right-click on the empty template in the joystick view and select “Set Horizontal/Vertical Joystick Channel” to define which axis should animate the expression.
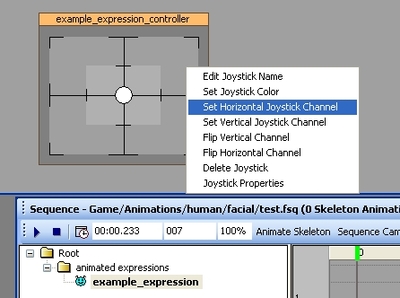
Now if you move the small white circle a key is automatically set at the current location of the time-slider. Be aware that this also works when you hit the play button, or the spacebar, which could be used to do a quick mouse movement capture session. Slowing down the playback speed can help with that.
After you saved the joystick setup from the main toolbar under joysticks >save as, make sure you also save the sequence, because the joystick-setup-file is referred in the sequence file so that the connections to the expressions in the sequence view are maintained.
This concludes the basic requirements to set up a head for facial animation. To be able to re-use already done expression libraries, or joystick-files and sequences, it is advisable to keep the naming convention for the morphs the same for all your head characters.